
New Order
You can purchase IoT tags, QR codes and TCC using the <New Order> menu button, located under “Store”.
Read more about the product details in <Hardware Products>.
Please follow the instructions below to place your order:
- Enter Order Name
Order name must be 30 characters or less. This is to help you look up your orders in the future.
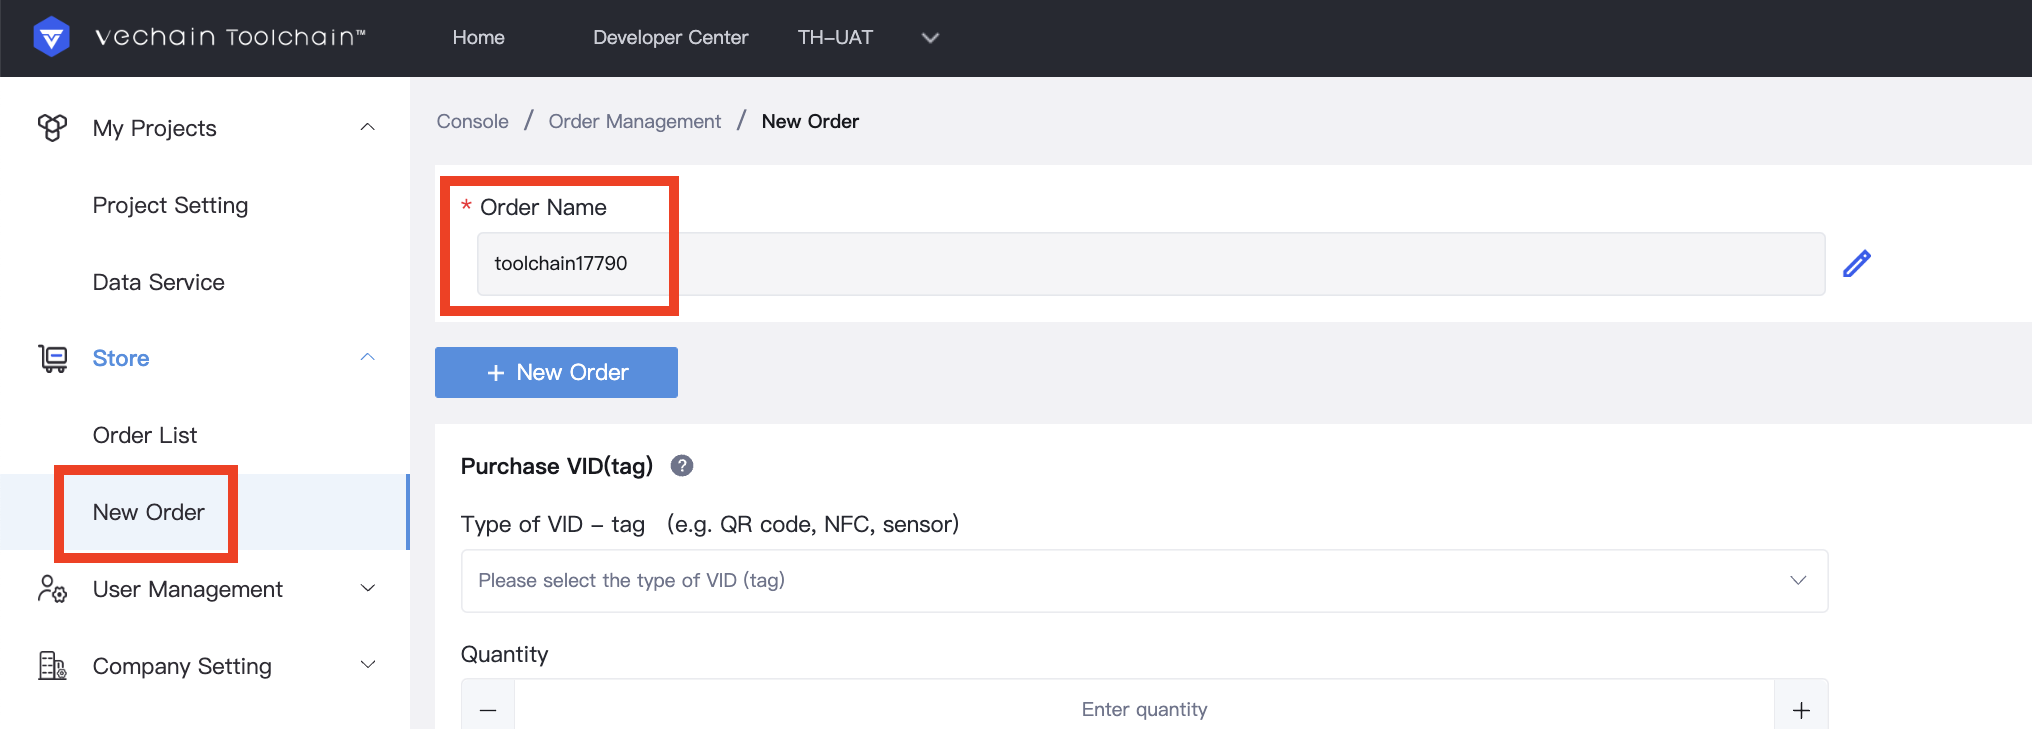
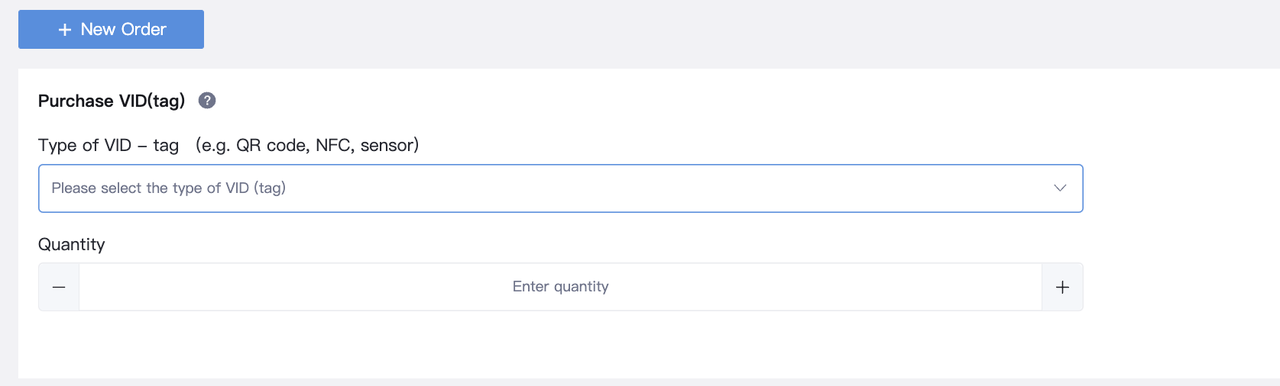
- Order Products
Select the products (IoT tags, QR codes, IoT devices) in the drop-down box and fill in the quantity. If you are purchasing multiple items at the same time, you can add more orders by clicking <New Order>.
When you purchase QR codes, you can choose to purchase a standard QR code or a custom QR code. If you need custom QR codes, turn on <Use custom IDs>.
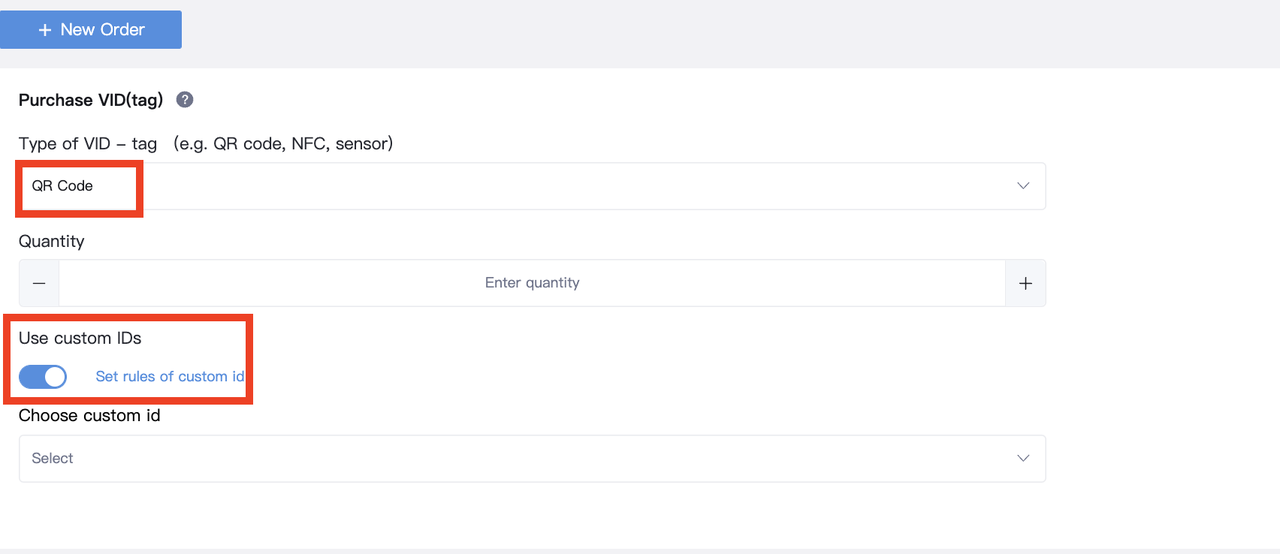
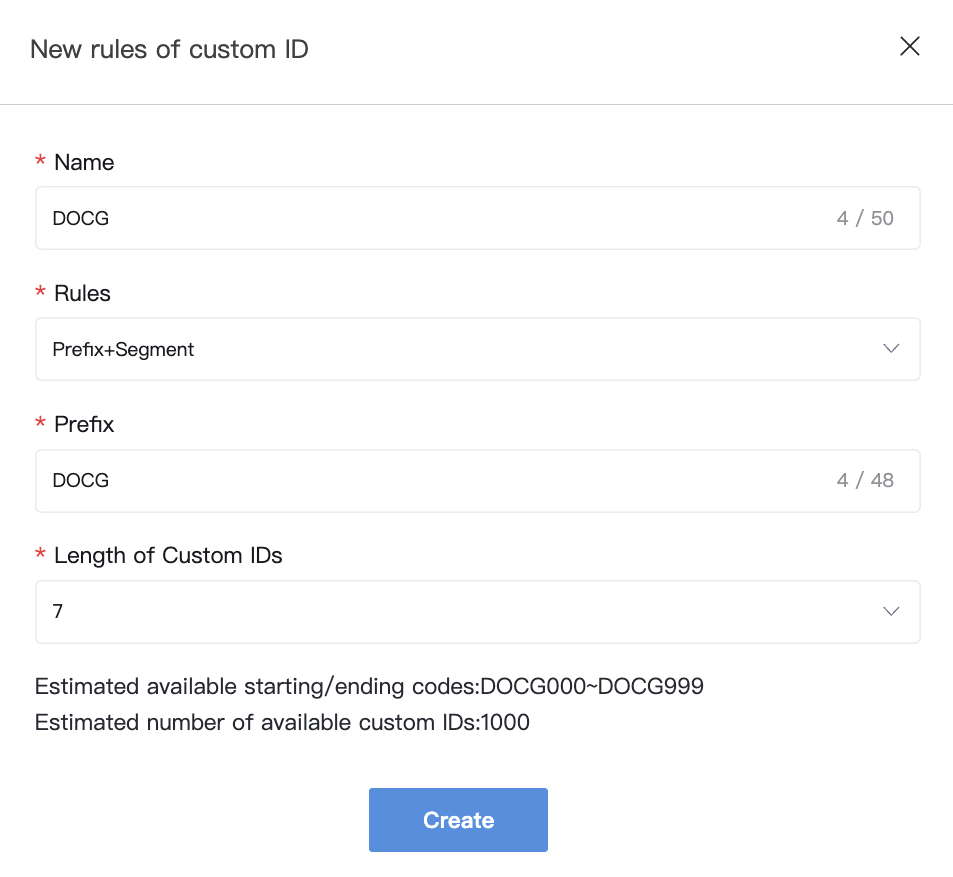
In order to use custom QR Codes, you need click <Set rules of Custom ID> and set up your custom code. Click <New> to create a new rule, and enter the name, rules, suffix and length.

There are two ways to generate a custom ID: <Segment + Suffix> or <Prefix + Segment>. After you enter your custom prefix or suffix, please input length for your custom ID and the system will automatically generate the codes in this length.
Please note that <Length of Custom ID> is the total length of <Segment + Suffix> or <Prefix + Segment>. For example, if you enter custom prefix DOCG, length 7, then a total of 1000 custom codes will be generated from DOCG000 to DOCG999.
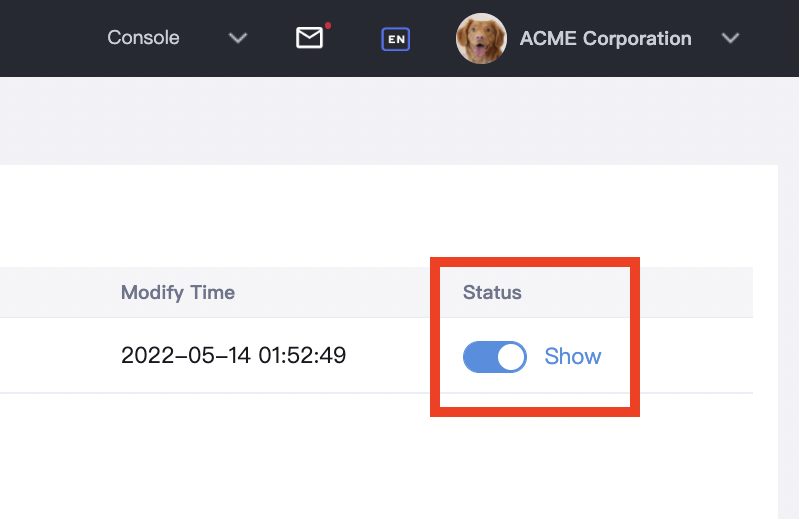
After you set up your rules, change their status to <Show>, so that when you place a new order, your newly created custom ID rule will appear in the list for you to choose. If you don't need to use the custom ID rule for the time being, simply turn it off.
When you place a chip order, you can customize the ID and URL.Make sure you fill in the accurate 'Delivery Information'. Once the order is successfully placed, we will deliver your products accordingly.
By switching on 'Set rules of custom ID' while creating a new order, you could add the existing custom ID rules. If there is no one applicable, you could set up one by via 'Set rules of custom ID'.
To add a custom URL, please select an existing URL setting under 'Create a new URL' section while creating a new order. The system will select the setting in 'Chip URL Settings' by default. Changes to URL settings could be made under 'Chip URL Settings'
Note: Total length of URL and custom id should be within 48 digits.
Order TCC: Select the TCC package that best suits your needs.
**You will only see TCC in the dropdown list if your product type is set to consume TCC.

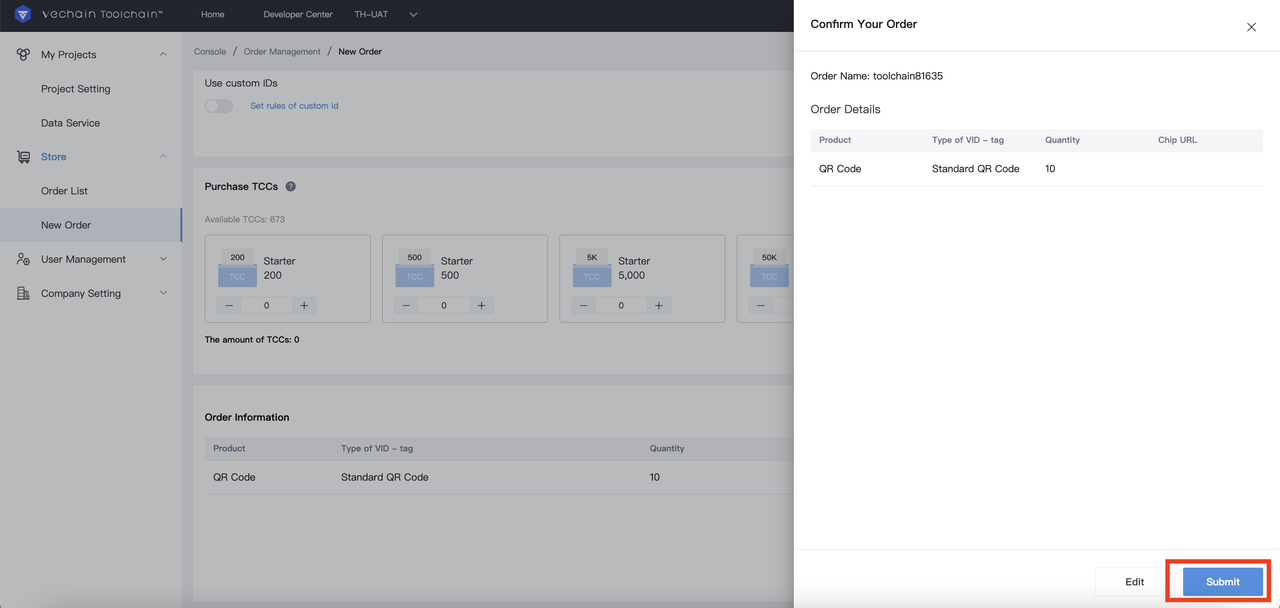
- Confirm Order
After you fill in all the information, click <Submit> to double check your order. Click <Submit> again to place your order.
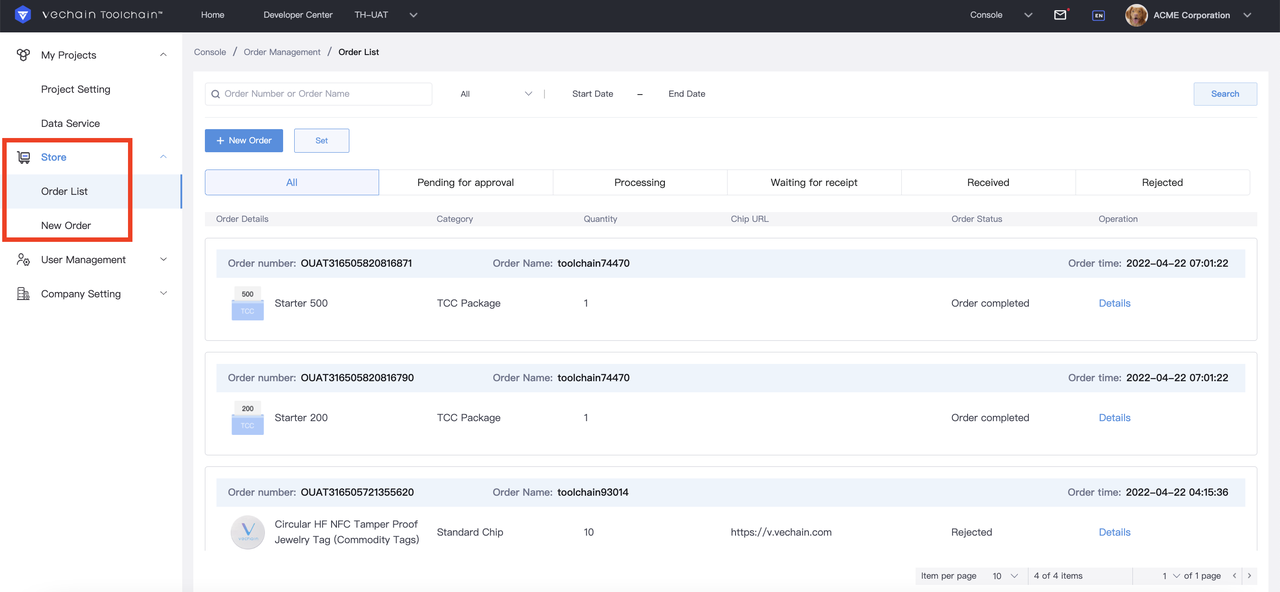
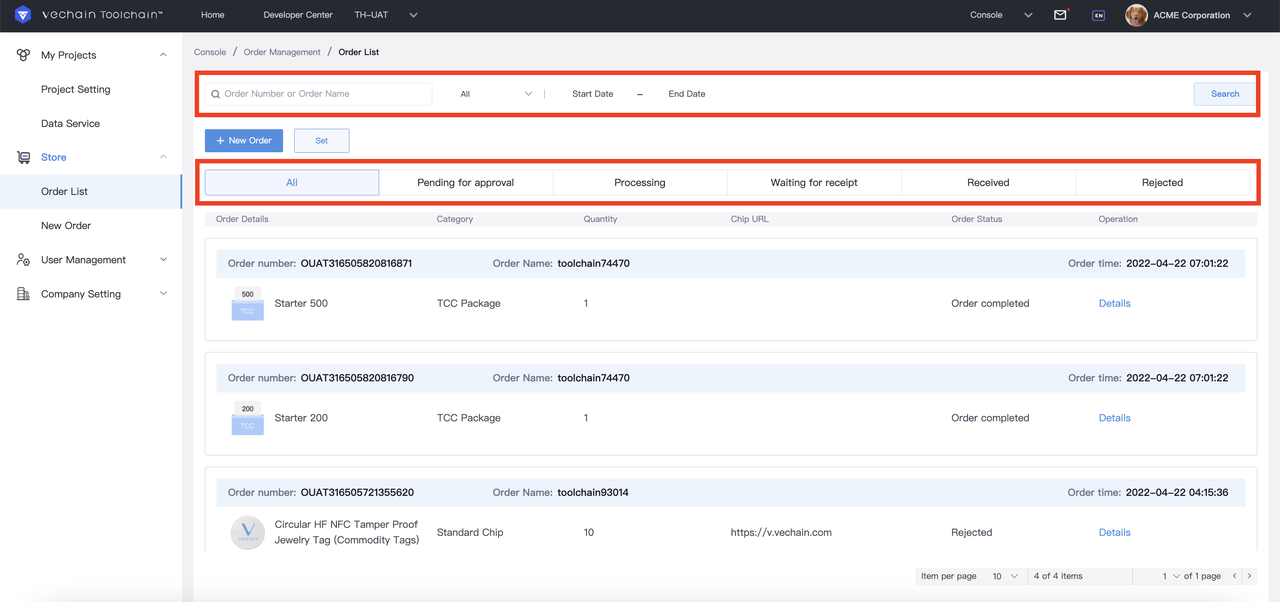
Order List
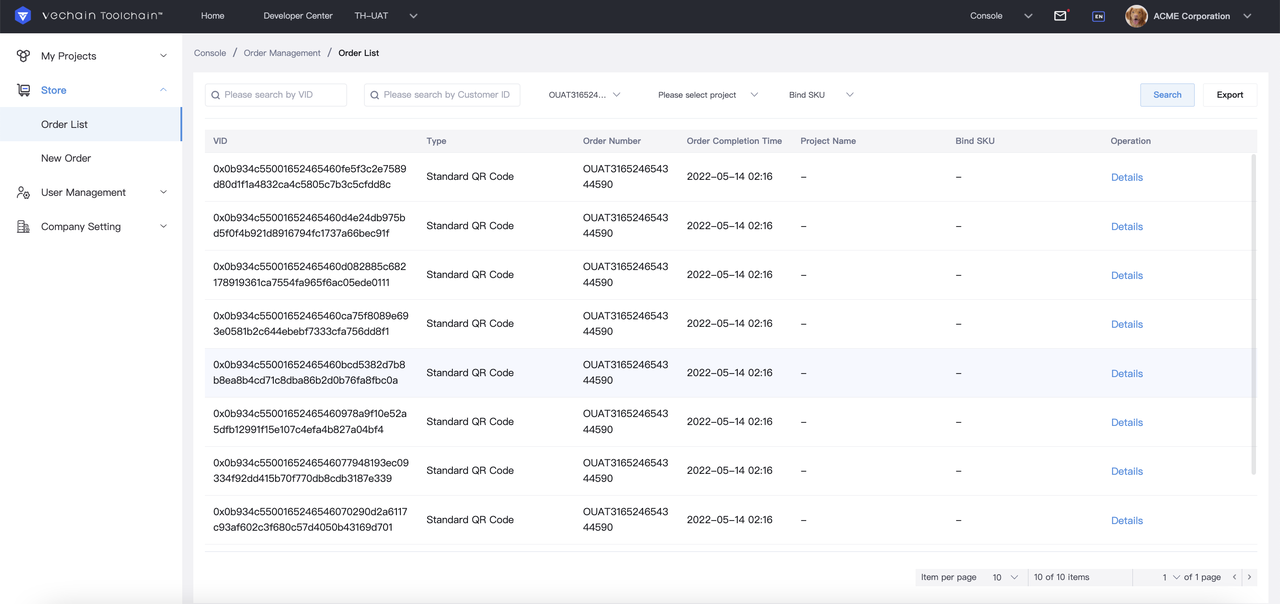
You can manage your orders under <Order List>. Fuzzy search by entering order number, order name or time interval. Or you can filter orders by order status. Click <Details> to check order details.
When your physical IoT products arrive at your office, click <Confirm> to confirm you have received the products. This will allow you to start using the chips and view all VIDs in this order.
When the system notifies you that your QR codes are ready, click <Confirm> in order to print your QR codes and use them.
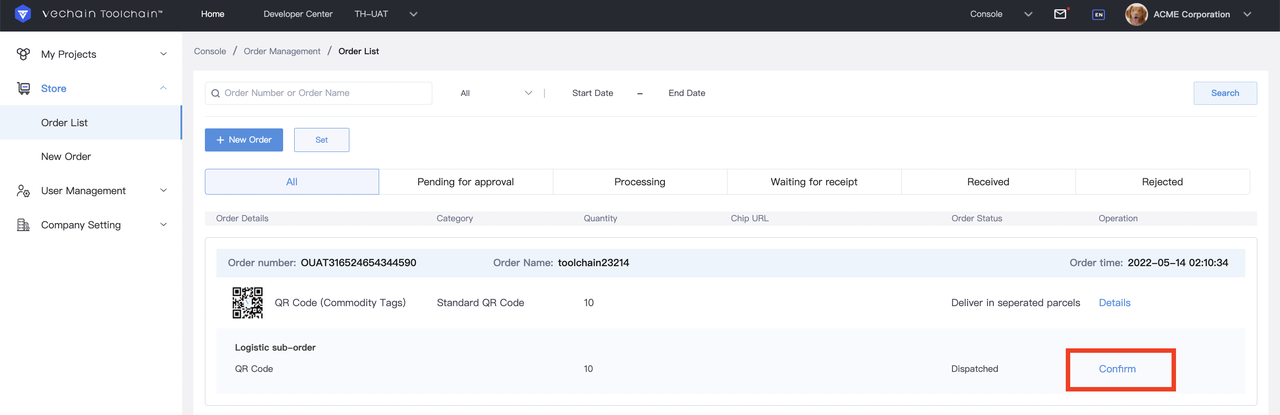
Once the receipt is confirmed, the ToolChain system will synchronize and associate VIDs with your IOT or QR codes. During synchronization, the order status will display “Synching VID data”. Please wait a few moments and then reload the page. Depending on the size of your order, the process may take some time. The order status will be marked as “Received” once the VID association and synchronization is complete.

-
Order Details
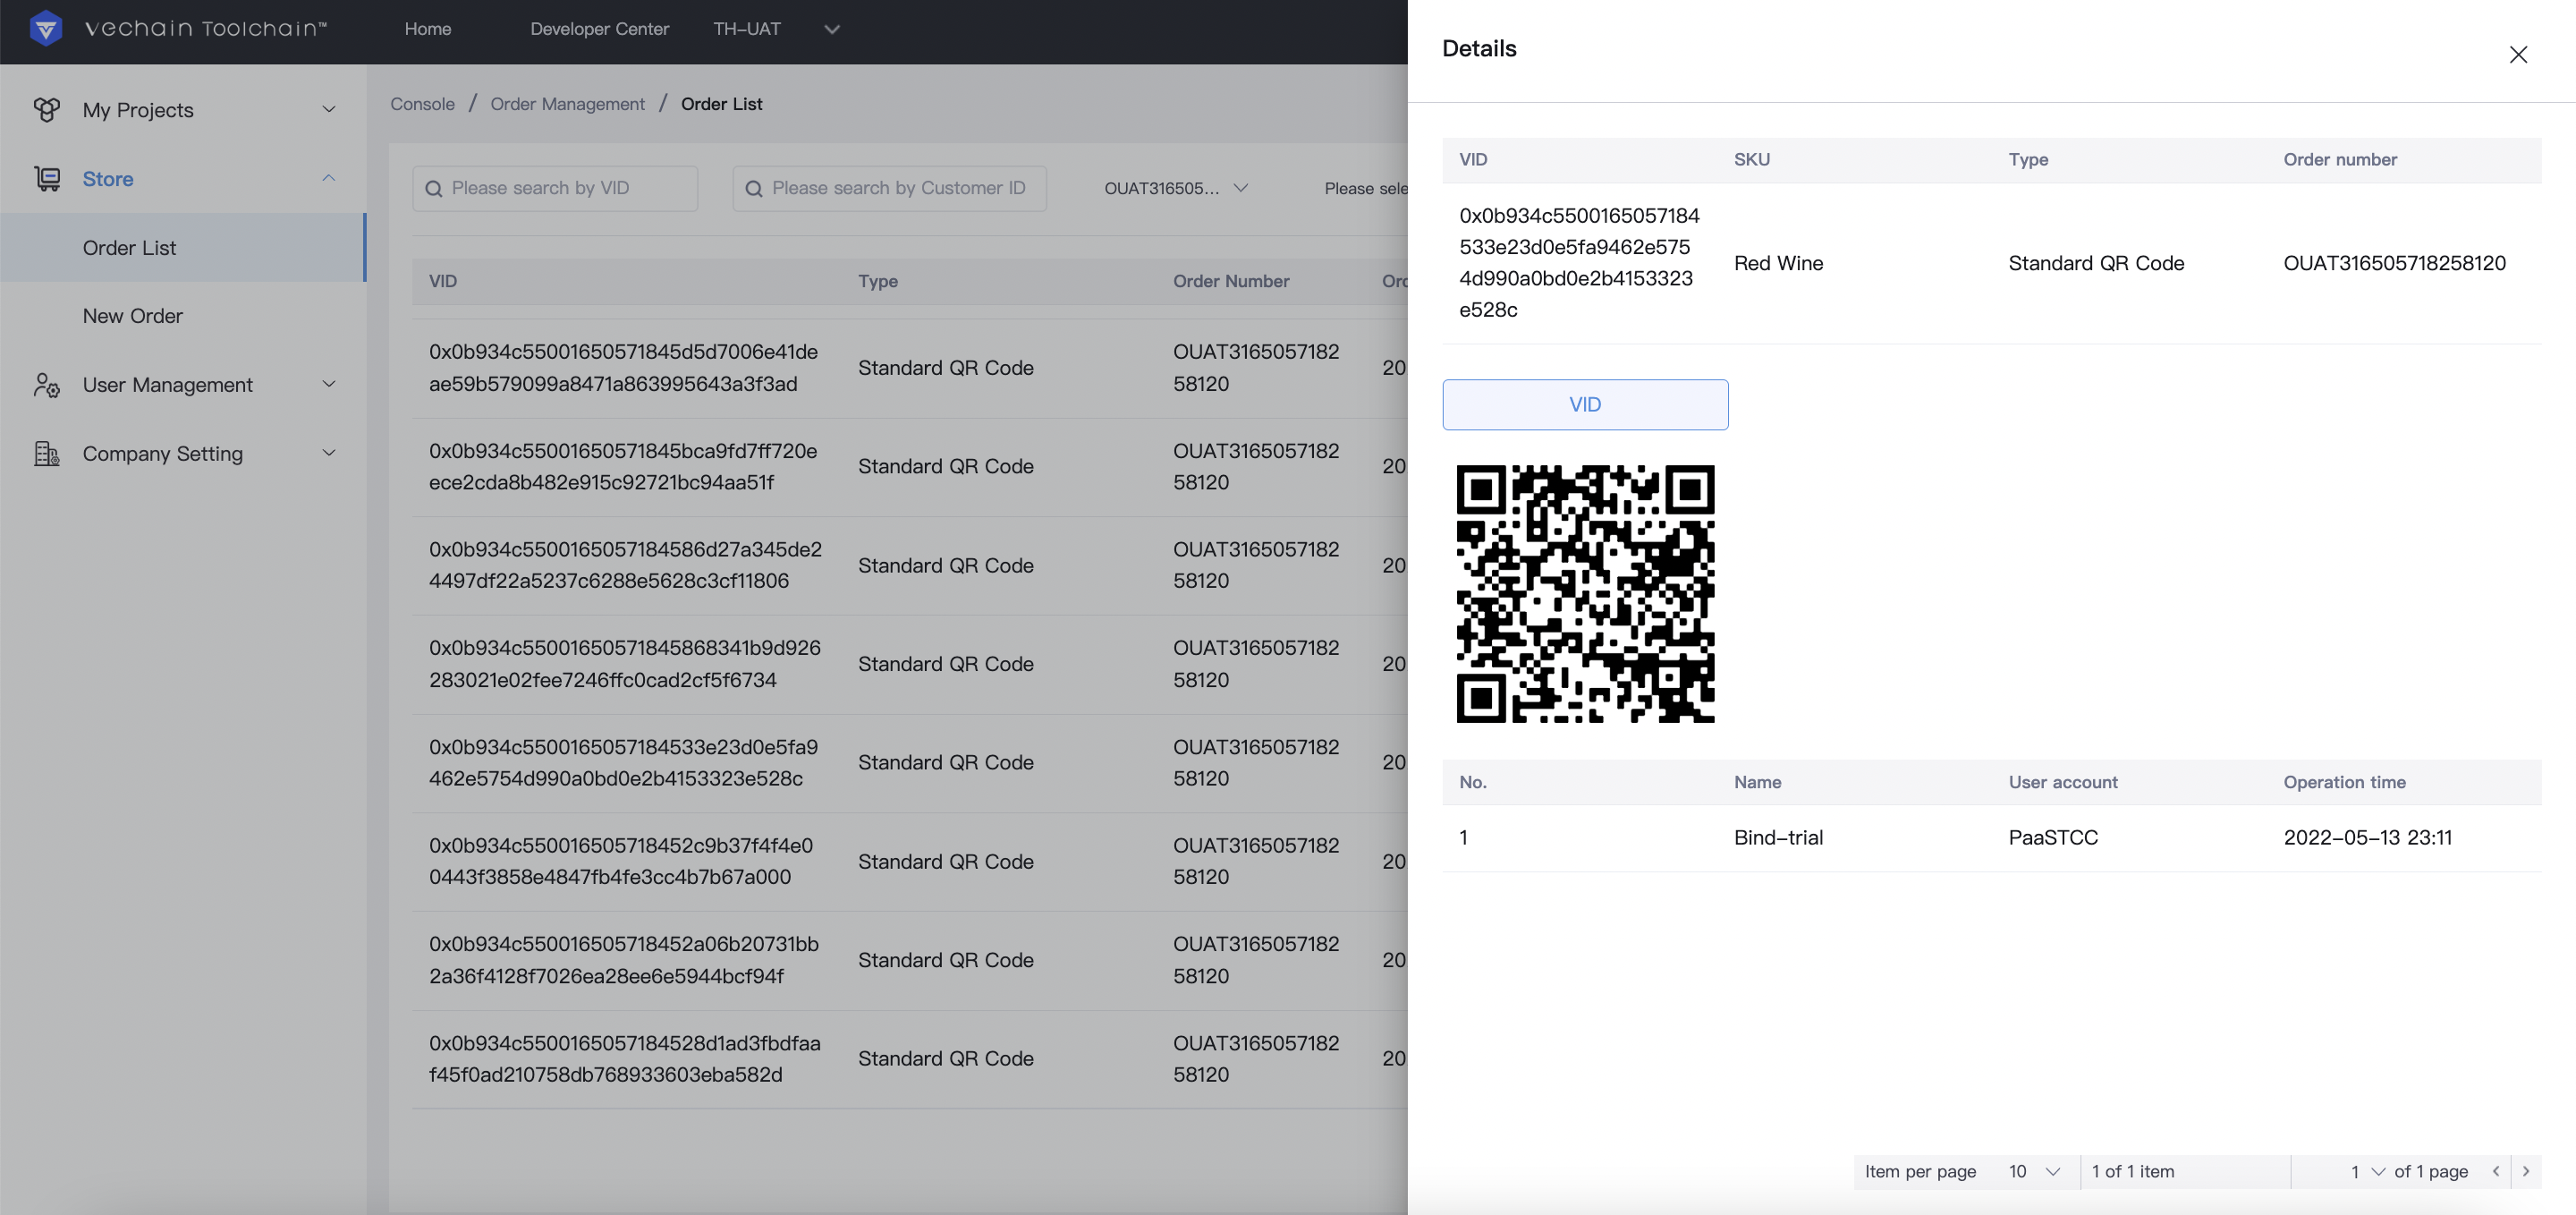
From the details page, click <Check VIDs List> in order to view the VIDs associated with that order. In the VID List you can see the VID, type, order number, order completion time, project name, SKU name, and operation on this VID.
Click <Details> to view the operation history of this VID, such as action, employee name, and operation time. Or you can scan the QR code here with your mobile device to view the landing page bound to this QR code.
Export VID: Under VID List, you can search VID by VID code, order number, project name, Bind SKU data, and date.
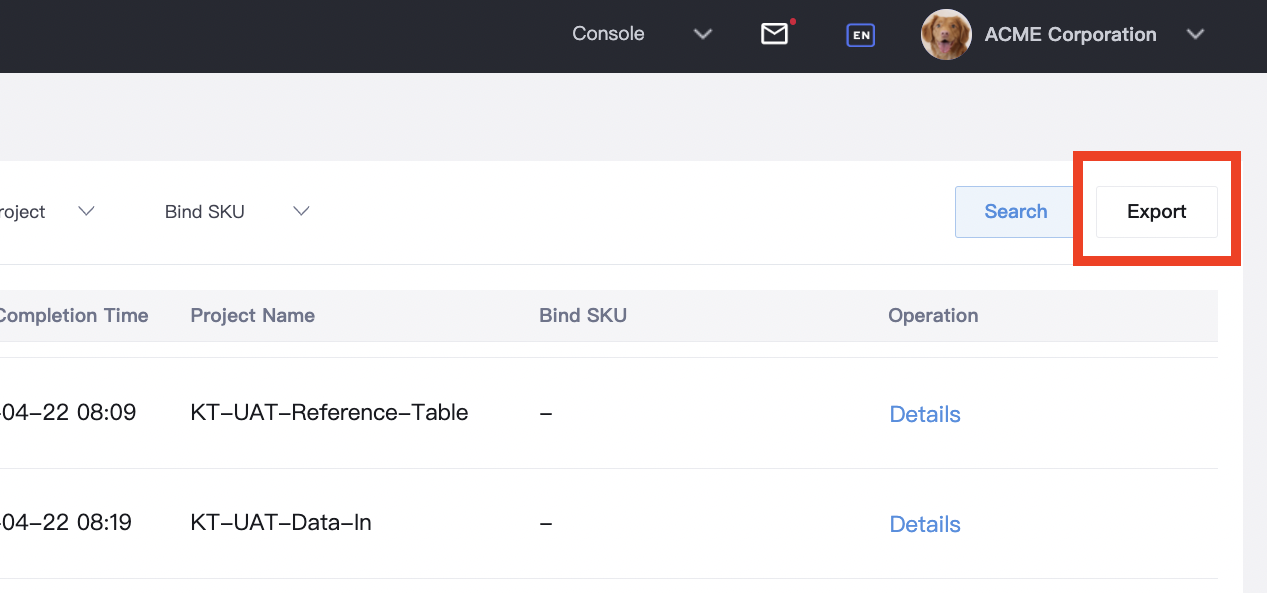
Click Export to confirm the action.
The data exported can be found in the [Task Center].
Click <Export> and <download> to print the QR codes you ordered. Use a QR Code printer to print the codes from the URLs in the excel sheet you download.
More Settings
Under 'Order List', by clicking <Set>, you could set up and change TCC Alert Threshold, Chip URL Settings, Rules of Custom ID, and Chips Display Rules.
Change TCC Alert Threshold
The TCC alert threshold is set to 50 by default. You can update it accordingly. When the TCC on your balance is lower than the threshold, you'll be alerted via email.
Chip URL Settings
Chips URL settings will define which URL web site address will show to end customers when they scan the NFC chips.
Initial Configuration: 'Default' Default URL address [https://v.vevids.com] will be presented while NFC chips are scanned with scanning equipment.
Optional Configuration: 'None' Present information stored in NFC chips only while NFC chips are scanned with scanning equipment.
Optional Configuration: 'User-defined' Users could customize the URL address. Customized URL address will be presented while NFC chips are scanned with scanning equipment.
Landing Page Display Rules Upon Failed Chip Verification
If chip verification fails, the landing page still shows full product information.
On: After scanning, if the chip fails to verify, the landing page will still display the full product information
Off: After scanning, if the chip fails to verify, the landing page will only display product information (recommended)
Comments
0 comments
Please sign in to leave a comment.